Upgrade Portfolio Slicer to new version
To upgrade Portfolio Slicer to new version you need to:
- Install new version of Portfolio Slicer.
- Update configuration file psConfig.txt with previous parameter values and set new parameter values.
- Run data extract scripts. Confirm that data in file Quotes.csv is TAB separated and NOT comma separated.
- Open old and new Excel workbooks side by side. Copy Excel table data from old workbook to new workbook (first remove existing table formatting in old workbook!!!). Repeat this step for each Excel table.
Upgrading from version 2.x to 2.2/2.3
When upgrading Portfolio Slicer from version 2.x to 2.2 you should follow these steps:
- Install new version of Portfolio Slicer.
- Copy old version of your configuration file psConfig.txt to folder with new scripts and add new parameters with values:
#ColumnSeparator values could be : Comma, Tab, VerticalBar
If your computer regional settings are set to use comma as decimal separator, then you should change last parameter value to "," (comma).
<ColumnSeparator>
Tab
</ColumnSeparator>
#DecimalSeparator: Default value is . (dot), in some countries this could be , (comma)
<DecimalSeparator>
.
</DecimalSeparator>
- Run data extract scripts. Confirm that data in file Quotes.csv is TAB separated and NOT comma separated.
- Open old and new Excel workbooks side by side. Copy Excel table data from old workbook to new workbook (first remove existing table formatting in old workbook!!!). Repeat this step for each Excel table.
- Refresh Excel table.
How to copy data from old Portfolio Slicer Excel table to new table
- Create a copy of OLD Portfolio Slicer workbook. You will have to make changes to this workbook and just in case you want to have an option to have old workbook in original state.
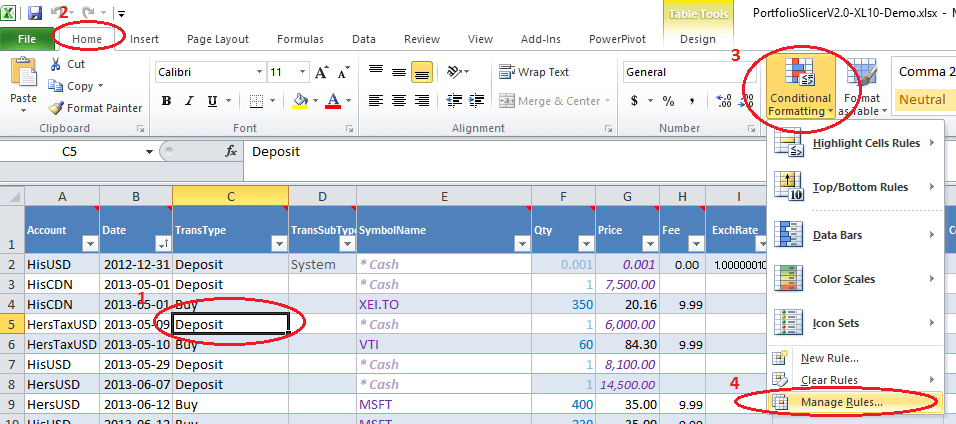
- In OLD workbook select any cell in the table and then from Home menu click on button “Conditional Formatting” and then choose menu option “Manage Rules…” .

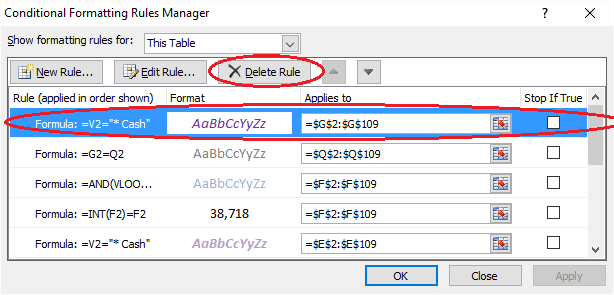
- In “Conditional Formatting Rules Manager” select EACH rule and then click on “Delete Rule” button.
Click “OK” button to close “Conditional Formatting Rules Manager” window. At this point conditional formatting in Old workbook was be removed.

- Compare column in old table vs new table. If they are the same - then you can select cells from old table and copy to new table. Keep in mind that sometimes some columns could be hidden - you can unhide columns by selecting group of columns and then at column header do right mouse click and choose “Unhide”. Never copy column if they have formula in them - you should always keep formulas from new version of Portfolio Slicer workbook.
Video - Upgrade from Portfolio Slicer 1.x to 2.0
Upgrade from Portfolio Slicer 1.x to 2.0
- Install Portfolio Slicer v2.0. Skip step to configure psConfig.txt file.
- Make a copy of your OLD Portfolio Slicer v1.x workbook.
- Go to “Old Portfolio Slicer” website “My Data\Web Workbooks” area. Click “Edit” link next to the web workbook you are migrating. At the bottom of the page you will see “Migration to V2.0 Data” section with data specific for your workbook. This data is formatted as comma separated values for copying into your Excel workbook. From this point in this guide we will call this data “Migration Data”.
Note: When copying Excel tables, you first will have to convert comma separated values into Excel table: (1) copy data into separate Excel workbook, (2) then select all data data and from menu “Data” choose button “Text to Columns”, (3) choose option “Delimited” and in the next screen click next to “Comma” option and click on “Finish”. This will convert comma separated values into Excel table that then could be copied into Portfolio Slicer Excel tables. - In “Migration Data” find line “# psConfig.txt - Next line will be first line for the file psConfig.txt”. Then copy text from next line up to line “# psConfig.txt - Line above is last line for the file psConfig.txt” into clipboard and paste it into “psConfig.txt” file by replacing all existing lines in that file.
- Run “UpdatePSData.bat” file. Review subfolder “Quotes” to make sure that you have now quotes for your investments.
- If you have investments for which quote data is not available anymore, but quotes were provided by Portfolio Slicer cloud database (for example DELL), please send us and email with subject “Missing quotes for v2.0 upgrade”. In your email please specify your workbook code. We will send you back zip file with quotes that might be missing. Please extract content of that zip file into subfolder “\Quotes\Manual\“. Please adjust your “psConfig.txt” file so it is not configured to request quotes for these symbols.
- Open old Portfolio Slicer workbook and new Portfolio Slicer workbook side by side.
- In “Migration Data” find record with “Config” table data and copy it to new workbook src worksheet “Config” table (first convert comma separated values into Excel table).
- In “Migration Data” find records with “Report Currency” table data and copy them to the new workbook src worksheet “Report Currency” table (first convert comma separated values into Excel table). In new table keep “Original” record as is, just replace record below it.
- In OLD Portfolio Slicer workbook remove conditional formatting from table “Account”. Select all “Account” records and copy them to NEW Portfolio Slicer workbook table “Account”. Review new table - it should not have red cells indicating problems.
- In “Migration Data” find records with “Allocation” table data and copy them to the new workbook src worksheet “Allocation” table (first convert comma separated values into Excel table).
- In “Migration Data” find records with “Symbol” table data and copy them to the new workbook srcSymbol worksheet “Symbol” table (first convert comma separated values into Excel table). Do not change first “* Cash” symbol data - leave it as is.
- In “Migration Data” find records with “Symbol Sector” table data and copy them to the new workbook srcSymbol worksheet “Symbol Sector” table (first convert comma separated values into Excel table).
- In “Migration Data” find records with “Symbol Alias” table data and copy them to the new workbook srcSymbol worksheet “Symbol Sector” Alias (first convert comma separated values into Excel table). These records are additional Symbol Alias records that you will need to add because Symbol code change (example in web workbook you had symbol TDB900.TO, but now for this symbol you will get quote from Google website, so symbol defined will be MUTF_CA:TDB900. In the next step you will have to migrate additional Symbol Alias records from your previous workbook.
- in OLD Portfolio Slicer workbook remove conditional formatting from table “Symbol Alias”. Select all old “Symbol Alias” records and copy them to new Portfolio Slicer workbook table. If you see any red cells in this table, you need to address them. You probably have to adjust Symbol column to point to new Symbol.
- In New Portfolio Slicer workbook worksheet srcTrans edit first “System” record and change Account with value from your account list and “Date” with minimum date of your workbook. Make sure this record will stay in this workbook after you copy data here from old workbook (next step).
- In OLD Portfolio Slicer workbook (worksheet srcTrans) remove conditional formatting from table “Transactions” (very important step!!!). Make sure that OLD table has all filters cleared. Order table by Date. Normally you should see first record with “TransSubType” as “System” (if no find that record manually) - select that record and delete it (select all cells in that row, right mouse click, “Delete”->“Table Rows”). Select columns from “A” to “AI” then on the same column headers do right mouse click and choose “Unhide” - this will unhide all columns. Starting from row 2 select data in cells from “A” to “O” (other columns have calculates values - no need to copy them) and make sure you select all rows with data. Copy that data into NEW Portfolio Slicer workbook table “Transactions”, but make sure that you do not change/update existing “System” record.
- In the NEW Portfolio Slicer workbook review “Transactions” table - make sure there are no cells with red background that indicate data issues. If there are any data issues - please fix them.
- Save your NEW Portfolio Slicer workbook
- Migration finished - you can proceed with refreshing Portfolio Slicer data. Please note that during first refresh it is possible that you will get error messages. Just click “OK” on first set errors and continue with refresh. After that run refresh process again and if you see error messages, click “OK” again. After this refresh set is completed, you should see all data in reports, and you should not see refresh error messages in next refreshes.