PowerShell environment setup
Overview
Portfolio Slicer includes PowerShell scripts to help manage external data files. One of these scripts reads data from an Excel file, and for that PowerShell requires ImportExcel module.
What You Usually Need to Do
In most cases, the setup process is:
- start a Windows shell with elevated permissions and then start PowerShell
- run the required PowerShell commands
- exit PowerShell and Command Prompt
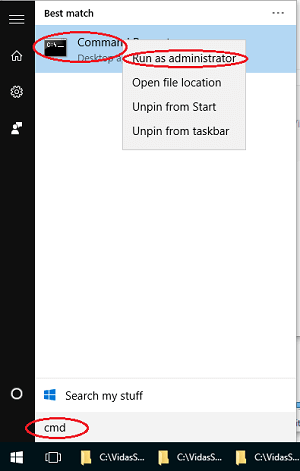
Step 1: Start a Command Prompt as Administrator
Open the Windows Start menu, search for cmd, right-click Command Prompt, and choose Run as administrator.
Administrative privileges may be required depending on how your system is configured and which execution-policy scope you use.
Then, in the Command Prompt window, type PowerShell and press Enter. This will start PowerShell.
Step 2: Run the Required PowerShell Commands
From the command prompt or PowerShell window, check the current policy run 3 statements:
Set-ExecutionPolicy -Scope Process -ExecutionPolicy Bypass -Force;
Set-PSRepository -Name PSGallery -InstallationPolicy Trusted;
Install-Module -Name ImportExcel -Scope AllUsers
Step 3: Exit from PowerShell and Cmd
Type the following command:
exit
This will exit PowerShell. Then type the same command again to exit Command Prompt.
One-Time Setup
You only need to configure this once during initial setup.